Friday, 3 October 2014

How To Execute JavaScript In Selenium WebDriver

Sometimes it is important to run JavaScript directly from the code to get any property of  Browser-BOM,  HTML-DOM  etc.
  • The Browser Object Model (BOM) allows JavaScript to "talk to" the browser. It includes Window, Navigator, Screen, History, Location etc.
  • With the HTML DOM, JavaScript can access and change all the elements of an HTML document. It includes Document, HTML, CSS, Elements etc.

We can execute JavaScript in 2 simple steps:

  1. Cast the WebDriver instance to a  JavascriptExecutor
    JavascriptExecutor js = (JavascriptExecutor) driver;
  2. Execute JavaScript
    js.executeScript("script for execution")

Example:


Saturday, 27 September 2014

Selenium WebDiver: Handle AJAX calls

The most common problem that we face during automation using Selenium WebDriver is how to handle AJAX calls. We never know when the call is complete and page has been updated. AJAX can be handled using JavaScript/JavascriptExecutor.

  In this post we will see how we can use JavaScript - jQuery.active to get all active AJAX calls and wait until all calls get served.

jQuery.active returns total number of active AJAX connections, and we are waiting until all active calls becomes zero or given Timeout reached.

Hope this helped you!!!

Thursday, 24 July 2014

Selenium WebDriver and TestNG: Running script in different browsers |Invoke different browsers

In this post will cover how to run a selenium script in different browsers.
To do so we will use TestNG and @Parameters annotation. Using TestNG we can directly pass parameter to test methods from testng.xml.  Below example makes it more clear

Prerequisites:


Java

  • Create a java class name BrowserContoller.java in your workspace.
  • Create a method setBrowser(String browser) to your class. This method takes a String as input parameter.
  • Add the annotation @Parameters ("browser") to this method. Value to the parameter will be passed from xml.

TestNG

  • Create a simple tesng.xml name say BrowserControllerTestng.xml
  • Define Test name, parameter and its value (firefox, chrome,  iexplore ) and class name.


Wednesday, 21 May 2014

Selenium WebDriver: Dropdown selection

Selenium has Select class designed to interact with drop down lists. Using it, we can easily choose option by displayed text, index or value.

Example:

Consider a dropdown list as shown below:


Now we just need to pass WebElement into Select Object as shown below

Select dropdown = new Select(driver.findElement(By.id("months")));

To select option say 'February', we can use any one of the method:
  • dropdown.selectByVisibleText("February");
  • dropdown.selectByValue("Feb");
  • dropdown.selectByIndex(2);

I have created a generic class Dropdown with all 3 methods shown above, we just need to call it.

  • Dropdown.selectByVisibleText(driver, By.id("months"), "February");
  • Dropdown.selectByValue(driver, By.id("months"), "Feb");
  • Dropdown.selectByIndex(driver, By.id("months"), 2);


Thursday, 8 May 2014

Selenium WebDriver – Handle Window Focus

Method and Description:


Example:

  • Below example opens a page of w3schools.com
  • And then clicks on ‘Try it yourself »’ link, which opens a new window.
  • Switch to new window, perform some actions on it and then switch back to previous window

Selenium WebDriver – Open a link in a new Window


We can use Action class to open a link in a new window.

Method and Description:


  • contextClick(WebElement onElement) - Performs a context-click at middle of the given element.
  • perform()- A convenience method for performing the actions without calling build() first.
  • sendKeys(java.lang.CharSequence... keysToSend) - Sends keys to the active element.


Example:

Below example opens w3schools.com
And click on “Learn HTML” link to open in new window.

Friday, 11 April 2014

WebDriver and TestNG: Capture Screenshot when Test fails

In this post will cover how to capture screenshot using Selenium WebDriver and TestNG Listeners when any test fails. To do so we have to extend TestListenerAdapter class.


TestListenerAdapter class implements ITestListener interface, So whenever a test fails it invokes method onTestFailure(ITestResult tr) and that we will use to call our custom method to take screenshot.


Monday, 7 April 2014

Selenium WebDriver: Handle File Upload

In this post, we'll cover how to upload files using WebDriver.

As we click on 'Browse' button it opens windows ‘File Upload’ dialog, which cannot be handled by WebDriver as it can only handle web based application


So to make it work, first make sure that element is visible and Instead of clicking on Browse button will use sendkeys()

  • Find the xpath of 'Browse' button
  • Enter absolute path of file to upload
  • Find xpath of 'Upload' button and click. 

Export Selenium Test from IDE to Eclipse| First Selenium WebDriver Program in Java | Eclipse, WebDriver, JUnit 4

By the end of WebDriver Tutorial you will be able to write your first Selenium WebDriver Script in Java. We will export the Selenium IDE recorded script and can use it with any other IDE like Eclipse.

To install Selenium IDE, please read my post 'Installing Selenium IDE'

Now, record the sequence you want to automate using Selenium IDE.  To learn more about how Record | Play and Modify script in Selenium IDE please read my post 'Record | Play | Modify script in Selenium IDE'.

Export Test case from Selenium IDE to Eclipse in Java and JUnit:
I have used  login sequence to Gmail as an example  in this post.  
  1. Now once you have recorded the steps/sequence, you will observe few Commands with their Targets/ Values in Selenium IDE Table Tab.


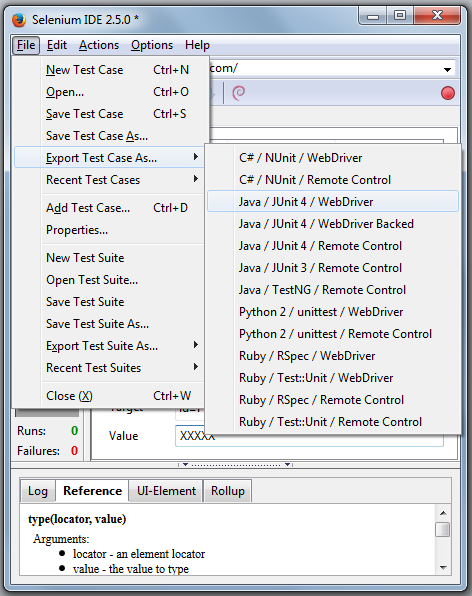
  2. From Menu click on File > Export Test Case As… > select Java/ JUnit 4 / WebDriver


  3. Save that file as .java


Import script in Eclipse: (Eclipse| WebDriver | JUnit 4)
If you don't have your Eclipse environment ready then please refer my post 'Configure Selenium WebDriver, Java and Eclipse'
  1. Launch eclipse.

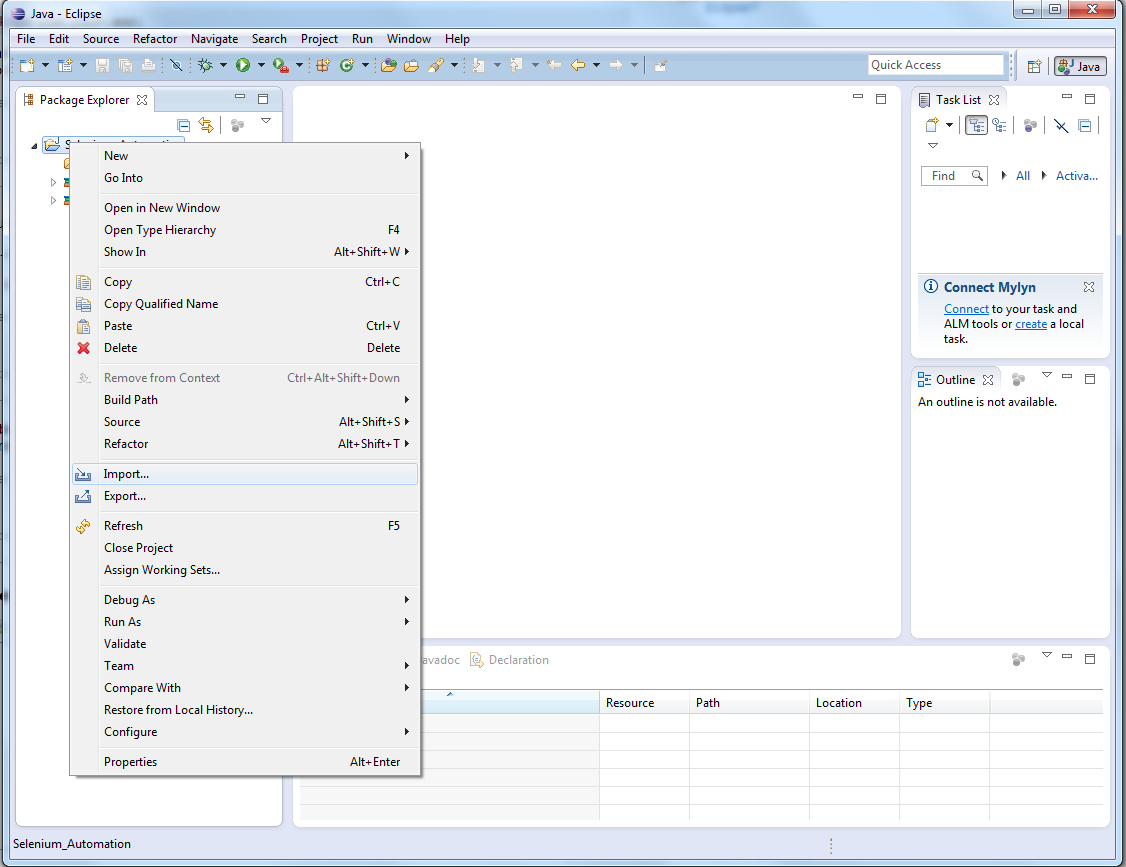
  2. Right click on ‘Project name’ > Select ‘Import


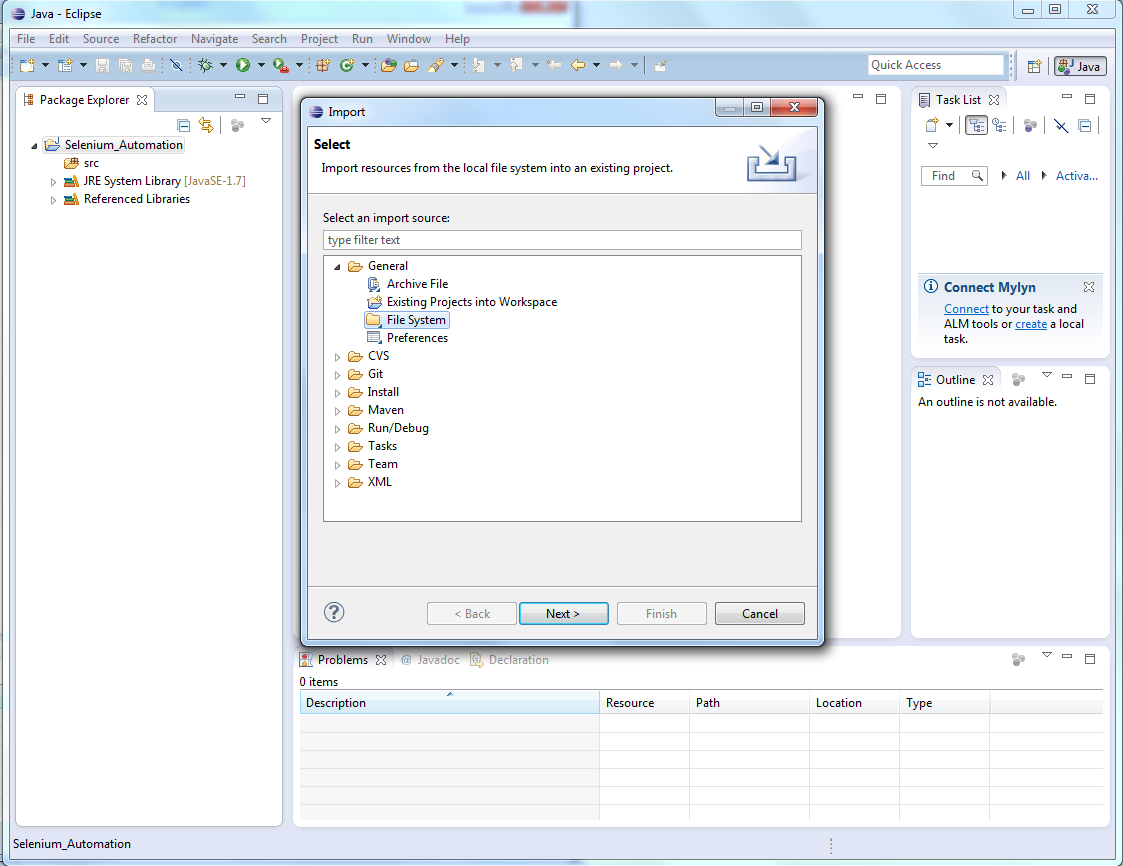
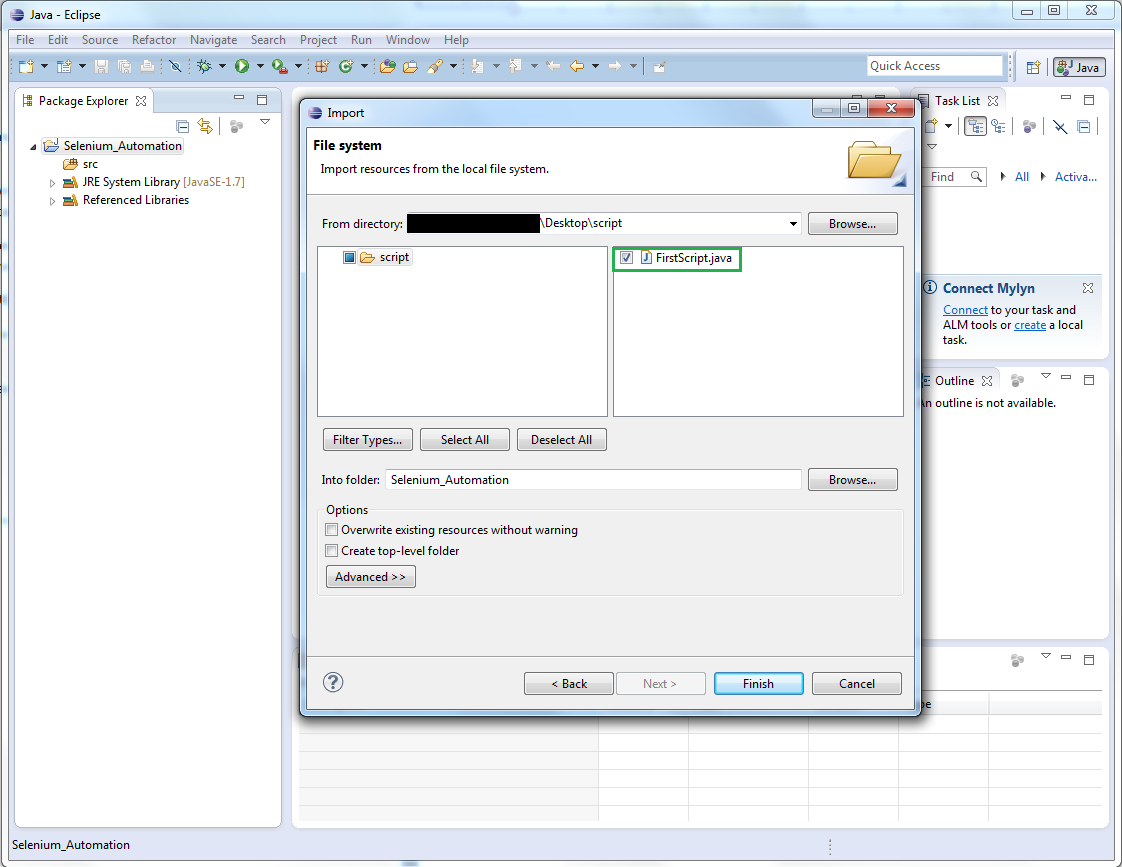
  3. Select ‘File System’ and click ‘Next’


  4. From directory’ > click on ‘Browse’ and provide the location of the saved script .java file.

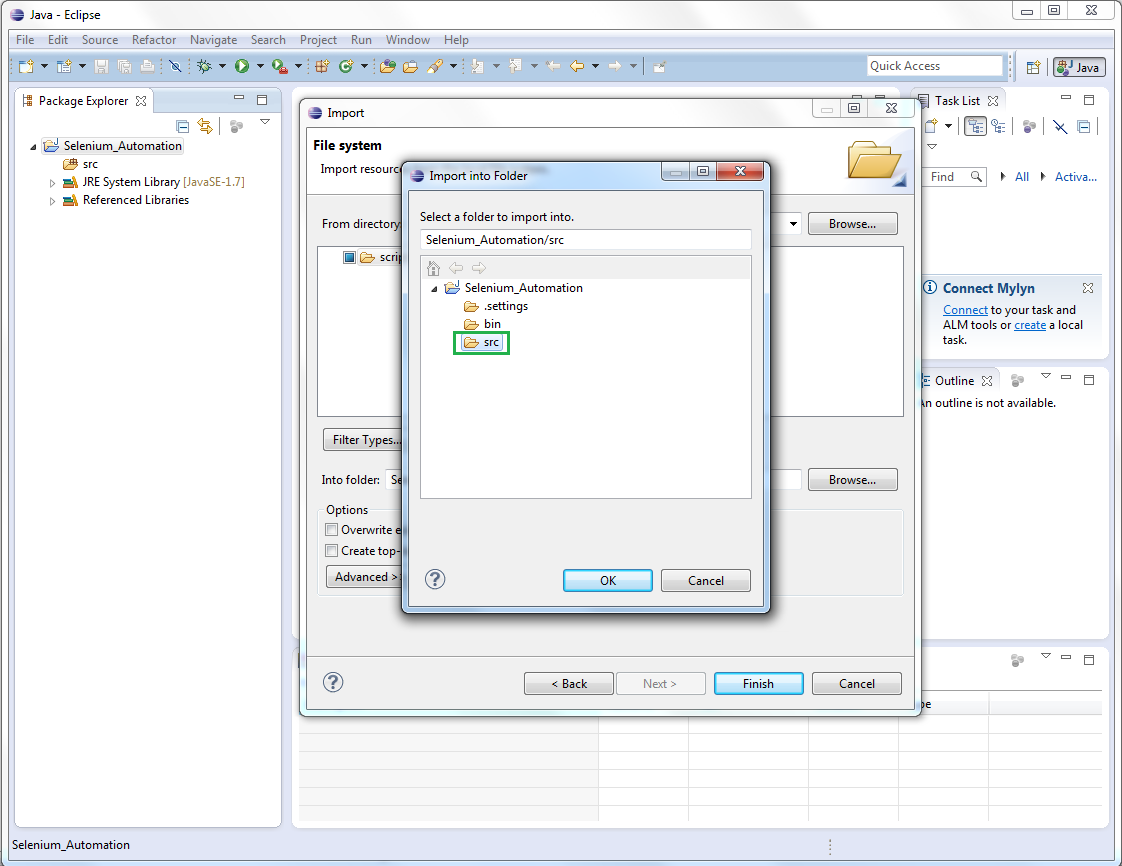
  5. Into Folder > click on ‘Browse’ and select ‘src’ folder of the project.


  6. Click Finish.

Fix Errors and Warnings in script:

Fix Error:
  • After importing the .java file you will see an error appearing in the code at 1st line. (as com.example.tests package doesn't exists)
  • Mouse over the error or click on ‘x’ icon in 'red' > it will open suggestion to fix it.
  • Select option to move the *.java to the given package. (You can select other option too)


Fix Warnings:
  • Mouse over on the warnings or click on Warning icons > it will open suggestion to fix unused imports, methods and values


Finally code will look like this: (Eclipse| WebDriver | JUnit 4)


Tuesday, 1 April 2014

Record | Play | Modify script in Selenium IDE

In this blog, will cover how to record, play and modify the recorded script in Selenium IDE. In this section will record a login sequence to an application, run the recorded script from IDE and modify username and password and run it again with modified values.

To install Selenium IDE, please read my previous post 'Installing Selenium IDE'

Start Recording:
  • Launch Firefox and open Selenium IDE from Tools menu (Ctrl + Alt + S keyboard shortcut)

  • Verify recording button status: Mouser over recording button should show text 'Now recording: Click to stop recording'.
  • Sequence: Now let’s record the login sequence to an application (Gmail)
    • Access application URL 'www.gmail.com'  in browser
    • Enter username and Password.
    • Click Sign-in button

  • Switch to Selenium IDE: Table tab- You will observe few Commands with their Targets/ Values
  • Stop recording:Click on recording button to stop recording. After clicking, mouse over the button should show text 'Click to record'

Play Recorded script: 
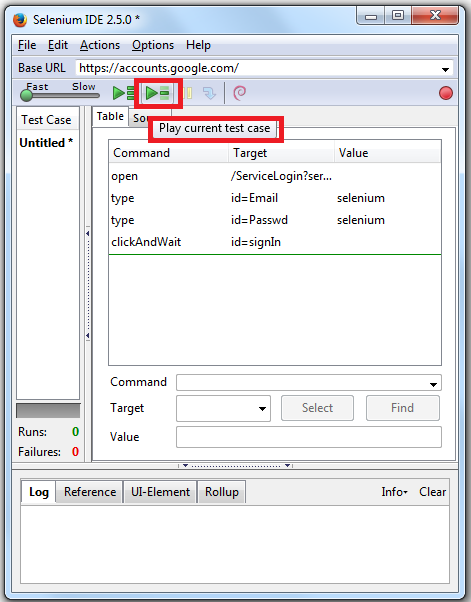
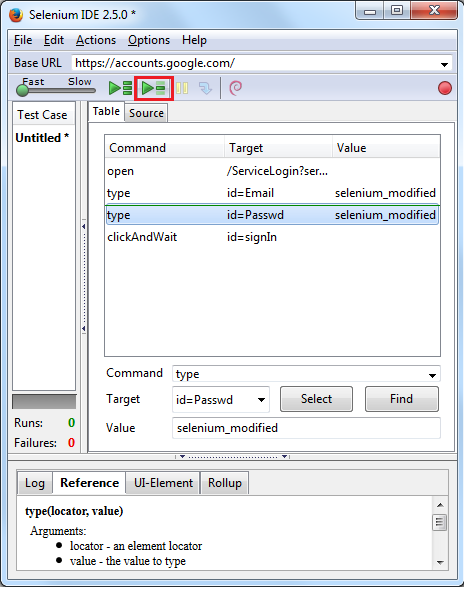
From Action icons click on icon which say ‘Play current test case’(just make sure your Firefox instance should be running).


Modify the script and Play: 
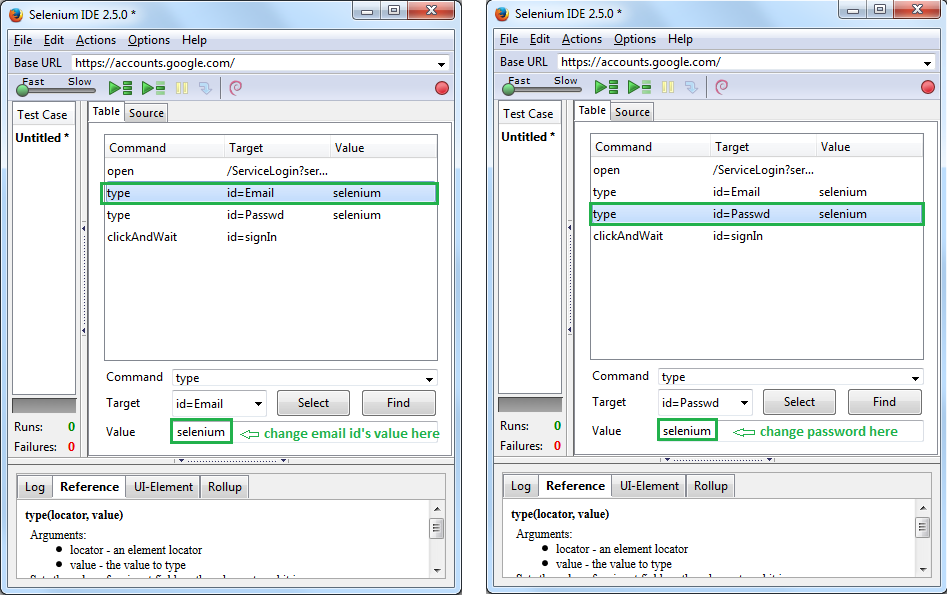
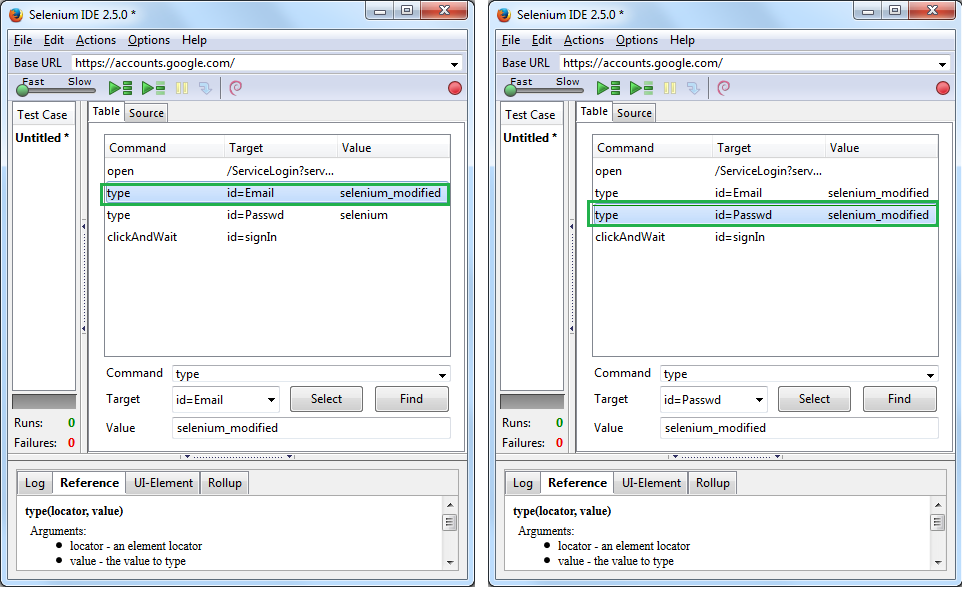
Selenium IDE - Table tab : Click on target you want to modify let’s say user’s  Email id and password.
  • Before modification:

  • After modification:


  • Play Modified script: From Action icons, click on icon which say ‘Play current test case’(just make sure your Firefox instance should be running)
Installing Selenium IDE

Selenium IDE:

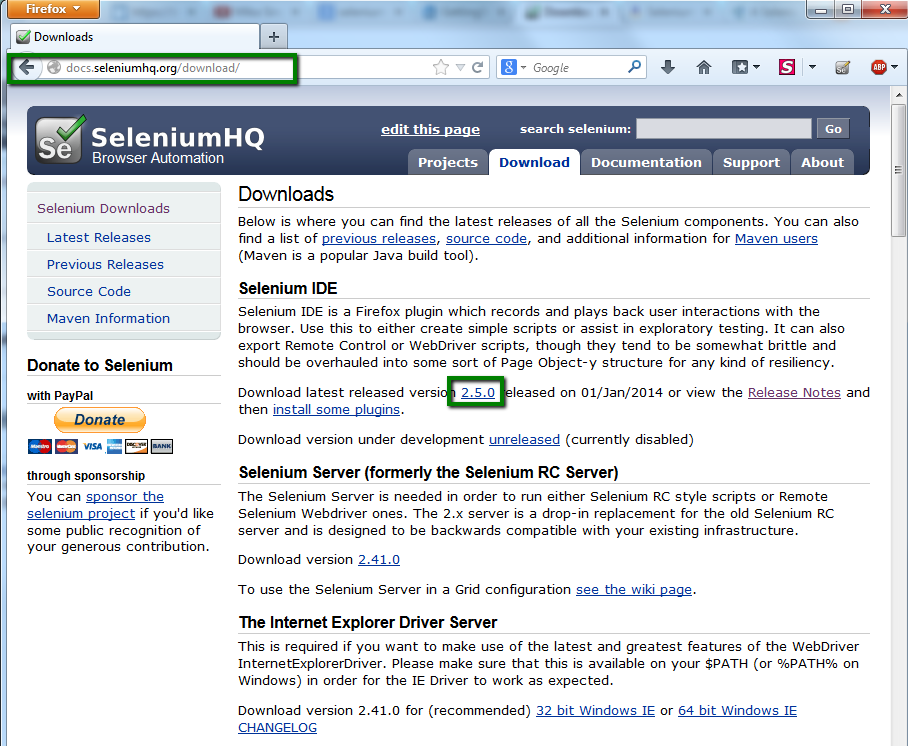
Selenium IDE is a Firefox plugin which records and plays back user interactions with the browser. Use this to either create simple scripts or assist in exploratory testing.
The Selenium IDE is an excellent starting point to start using and learning Selenium. For that lets first add Selenium IDE in Firefox.

Install add-on:

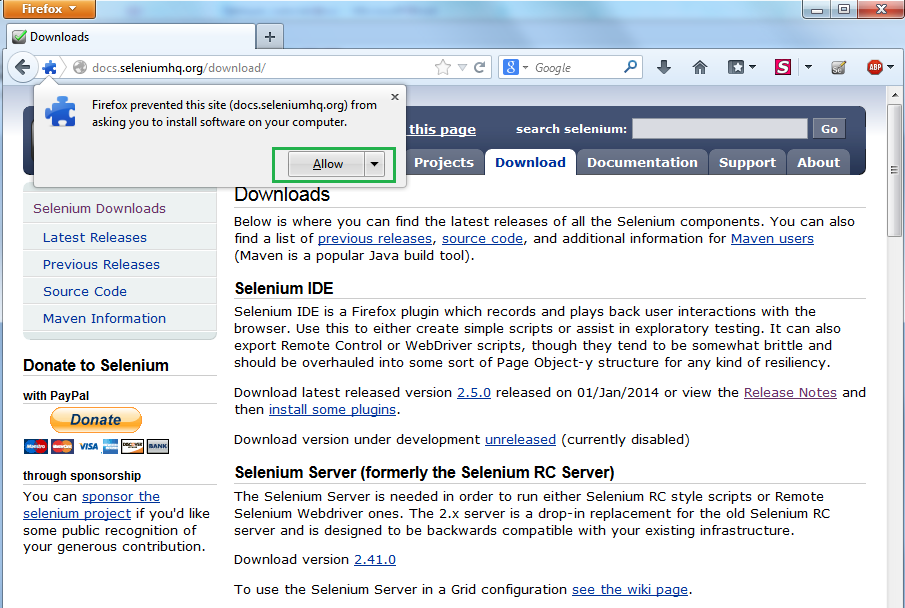
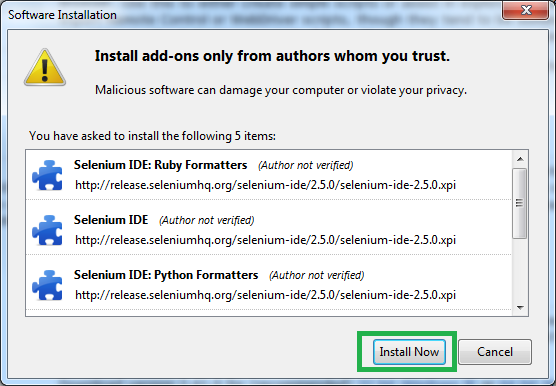
  • A popup appears to ask your permission to install this add-on > click Allow


  • Install the add-on and restart the Firefox.


  • Once you have it installed, launch Selenium IDE by navigating to Tools -> Selenium IDE (Ctrl + Alt + S keyboard shortcut)


  • Launch Selenium IDE:


Selenium IDE overview:
  1. Base URL: Application URL that we want to automate using Selenium
  2. Actions:  Right under the Base URL field, we have the some action icons:
    • Play entire test suite
    • Play current test case
    • Pause /resume
    • Fast/Slow slider - to play script with desired speed
    • Start /Stop recording button etc.
  3. Table /Source – Here is where our script’s functionality will appear/live as we create it. We can also modify our scripts if required and can view the code from ‘Source’ tab.


Wednesday, 26 March 2014

Configure Selenium WebDriver, Java and Eclipse

Java:

Download and Install latest Java SE Development Kit 7 (JDK) from Oracle


Setup environment variables for Java:

Windows 7:
  1. Select Computer from the Start menu > Properties
  2.  Click Advanced system settings > Advanced tab
  3. Click on Environment Variables, under System Variables, find PATH, and click on it.
  4.  In the Edit windows, modify PATH by adding the location of the class to the value for PATH. If you do not have the item PATH, you may select to add a new variable and add PATH as the name and the location of the class as the value.
  5. Click Ok.


For other platforms, please refer http://www.java.com/en/download/help/path.xml

Eclipse

  • Download Eclipse (Eclipse IDE for Java Developers) from http://www.eclipse.org/downloads/
    Note: Make sure to choose correct version as per your OS (Windows 32 Bit and 64 Bit).


  • Unzip the ‘eclipse’ folder from the zip to some directory.

Download Selenium Client & WebDriver Language Bindings

Download latest WebDriver bindings from official website http://docs.seleniumhq.org/download/
and unzip the selenium-java-2.x.x.zip folder to some directory.


Setup a Project in Eclipse:

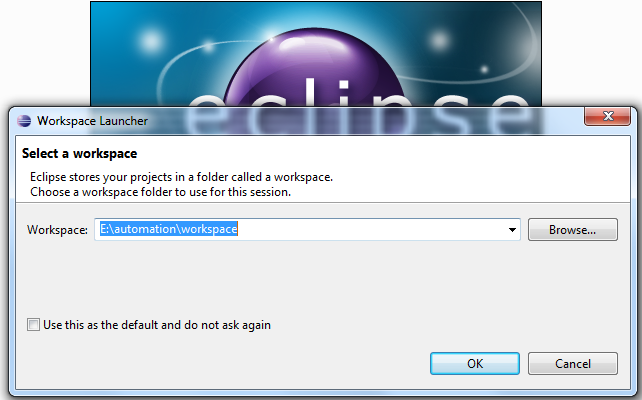
Launch eclipse: Launch eclipse and provide workspace location.


Select Workbench:


Create a new project: Click on File menu –> New –> Java Project -> Enter project name as “Selenium_Automation” and click finish.


Configure Build Path:  

Right click on Project Name > Properties > select Java Build Path… > select Libraries tab > click Add External JARs... > add WebDriver JARs (by providing the location of extracted WebDriver language bindings/JARs)
OR
Right click on Project Name > Build Path > click Configure Build path… > select Libraries tab > click Add External JARs... > add WebDriver JARs (by providing the location of extracted WebDriver language bindings/JARs )


 Now your environment is ready to run selenium scripts


TestLink API integration with Selenium (WebDriver) script


Summary: By the end of this article you will be able to integrate WebDriver with TestLink. This integration will update the results in TestLink.This article will cover the following:
  •         TestLink: Download necessary JAR files
  •          TestLink: How to enable Test Automation API’s
  •          TestLink: Generate Personal API access key
  •          WebDriver: Creating and implementing script
  •      Testlink reports before and after executing the script

TestLink:

Pre-requisites: You should have TestLink setup up and running with a PROJECT that should have a TEST PLAN, BUILD/RELEASE and some TEST CASES assigned to it.

Note: We will use Project Name, Test Plan Name, Build /Release Name and Test cases ID later while writing selenium script.

Download JAR files: Download testlink-api-client-2.0.zip from Google Code and add the following jar files in your WebDriver java project class path.
‘testlink-api-client-2.0.jar’, ‘xmlrpc-common-3.1.jar’, ’xmlrpc-client-3.1.jar’, ‘ws-commons-util-1.0.2.jar’

How to enable Test Automation (API keys):
  •          Log In to TestLink using admin user
  •          Navigate to Desktop > under ‘Test Project’ > select ‘Test Project Management’
  •          Open appropriate Project > click on check box “Enable Test Automation (API keys)” > click on ‘Save’ button.

Generate Personal API access key:
  •          Click on link ‘My Settings’ > opens Account Settings
  •          API Interface section: Click on ‘Generate a new key’ button > you will get an access key.


      Creating and Implementing Script: Use the below mentioned code but make sure that you make the necessary changes to the file:

Example: Just change Test case ID's as per your test cases.

TestLinkUtils: replace TestLink Server URL, Access key, Project Name, Test Plan Name, Build Name as per your TestLink setup.

TestLink Report before and after executing the script

Before:

After: